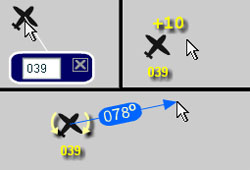
Select desired Navaid type and settings. Drag aircraft on horizontal or vertical panels to change the aircraft's position in relation to the facility. If North Up is selected aircraft heading changes can be set by positioning the cursor close to the aircraft on the horizontal panel then clicking the button when a "-" or "+" appears. If Heading Up is selected, aircraft heading changes can be set by positioning the cursor close to the navigational facility on the horizontal panel then clicking the button when a "-" or "+" appears.
Additionally there are two new ways to set the aitcraft's heading:
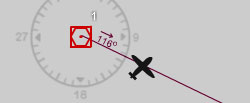
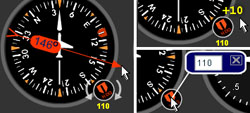
1. Double clicking on the aircraft will cause a small window near the aircraft to open with the current heading in the edit box. Changing the value in the edit box to any value from 1 to 360 will change the aircraft heading to that heading.
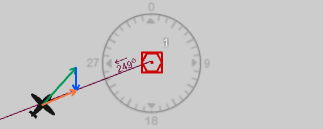
2. Holding Shift key down and moving the cursor near the aircraft center will display a blue arrow extending from the center of the aircraft with the current direction of the arrow from the aircraft in degrees displayed on the line. While holding the Shift key down and moving the mouse cursor around the map, the arrow radiating from the aircraft will follow the mouse constantly showing the direction from the aircraft. Clicking the mouse button will change the aircraft heading to the current direction of the blue line. Release the Shift button to hide the blue line.
Knobs are set the same way as the heading of the aircraft (as described above), except that instead of placing the mouse on the aircraft symbol, the mouse is placed on the knob.
You can use the keyboard to control the movement of the aircraft. The following are the keys that control the aircraft:
IMPORTANT KEYBOARD CONTROL NOTE: The simulator start button must be pressed and the aircraft rotating-arround-the-globe icon must be moving for the keyboard commands to work. In addition, if clicking outside the simulator (like clicking on the browser scroll bar, text or any other area outside) the browser may stop sending the keyboard commands to the simulator. You must click on any blank portion of the simulator to allow the browser to transfer keyboard commands to it. You can also still drag and reposition the aircraft even if it is moving.
When Heading Up is selected, even though it may seem that the aircraft rotates around the navigational facility, the aircraft remains in the same position when changing heading. The reason for this is that the display will always show the navigational facility in the center of the display. This means that regardless if North Up or Heading Up is selected the aircrafts position will always be relative to the navigational facility.
Knobs are set the same way as the heading of the aircraft (as described above), except that instead of placing the mouse on the aircraft symbol, the mouse is placed on the knobs symbol.
General Explanation of Features:
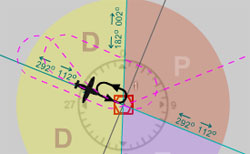
Compass Rose - Used as an aid to show the orientation of the Horizontal Navigation panel. It serves the same purpose as the compass rose symbol on IFR en route charts to show direction in relation to the magnetic north.
Horizontal Panel - Displays the horizontal position of the aircraft in relation to the navigational facility the same way an IFR en route chart or an approach plate's plan view would.
Vertical Panel - Displays the vertical position of the aircraft in relation to the navigational facility the same way an approach plate's profile view would.
Navigation Aid Type - Selects the type of navigational facility. Some features such as DME or glide slope will only work with certain types of facilities.
General Settings Section - Select and activate different feature such as setting wind, viewing wind triangle, zooming map and more.
Other Settings Section -Contains additional settings such as the holding pattern template.
Navaid Information - Displays information such as radial, magnetic bearing, and more.
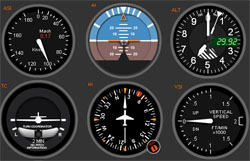
Needles - For simplification purposes the simulator is tuned either to a VOR type navaid or and NDB type and behaves as if one were operating and tuned to a station and the other was and vice versa depending on the navigational facility selected. The two needles have two distinct behaviors when not receiving an adequate signal. The needle associated with a VOR type navaid will always point to the 180 heading of the RMI when not receiving a signal. The needle associated with an NDB type navaid will stay at 3 o'clock position regardless of the heading.
Performance - When using computers that that may be slower this section can be used to improve speed and processor usage by increasing preset parameters such as screen refresh rate and reducing size of the aircraft trace path. On faster computers you can take advantage of having smoother animation and a larger trace path.
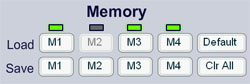
Memory - Allows you to save a snapshot of aircraft position and settings to memory. In most browsers the memory will remain even if you close the page and load it again later so you can continue where you left off. Note: for users of luizmonteiro.com's Navigation simulator the Memory function is not retained when the simulator is closed, since you can save the settings to a file.
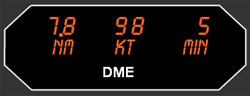
*Please note that DME may not be present with some facilities. The DME distance shown is the approximate value a DME would indicate if such navigational facility were collocated.
CAUTION: The behavior of the RMI and other information displayed is approximate for illustration purposes only and may not reflect the actual readings on the RMI and DME.